Home Building Articles
Sealing the Shower, Reliably
August 2016
Keeping water away from where it doesn't belong is all in the details. Here's a checklist
Every time you drive a large volume of water onto a building surface you run the risk of it penetrating that surface and getting into the structure. It's
as true for wind-driven rain on a stucco wall as it is for a multi-head luxury walk-in shower. In the case of the shower, in fact, it's worse, because
some 2 gallons of water or more per minute sprayed in a compact area across porous materials such as mortar, ceramic tile, and grout is a sure recipe
for leaks.
Like most quality issues, the key to eliminating a leaky shower is in the details, which amount to more than a gap-free bead of caulk. You need to think
about where the water is going, what it's hitting, how it drain, and whether your shower design is helping or hindering the chances of water penetrating
to the framing and causing all sorts of costly problems.
For example, the shower seat need to slope a little – like a flat roof, almost imperceptible – away from the wall. This way it can shed shower
water to the pan and drain instead of the water pooling on the surface where it intersects the wall.
But does the seat need to be right across from the shower-head? To mitigate leaks, shower seats are often best placed to one side or in the corner of
the shower enclosure to avoid a direct hit while the homeowner waits for the water to warm up.
Another thing: Let's stop building showers pans from scratch. If the shower is a common size, it makes more sense to use a molded on-piece shower pan
and avoid the risk of getting it wrong and having the water pool or leak.
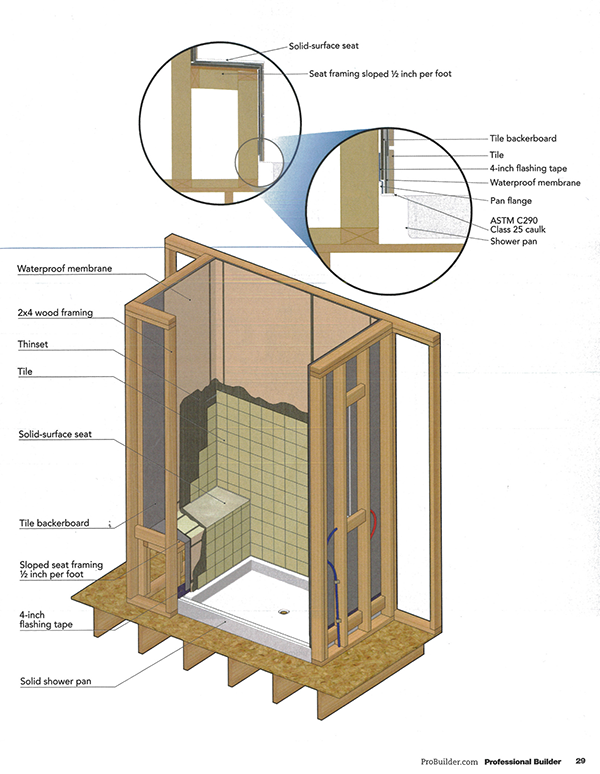
A quality-built walk-in shower isn't any more expensive or time-consuming to build than the one that's designed for call-backs. Use the illustration opposite
and follow this checklist to take burden off your warranty service team and better protect your profits:
- Framing: Frame the shower square and level with enough solid backing/blocking to securely fasten the shower pan nailing fin and flashing material.
- Flashing: If using a preformed pan, consider using a self-adhering flashing tape to bridge the flange of the shower pan to the framing.
- Seat: Design the seat and other horizontal surfaces (built in niches, etc.) away from direct water and sloping ½ inch per foot toward the pan/drain.
- Tile backer: Use a backerboard approved as a substrate for tile, hung with factory edges down. Leave a ¼-inch gap between the backerboard and the top
of the pan flange.
- Pan: Use a molded one-piece shower pan with a protective front lip to ensure proper slope to the drain and to contain splashing.
- Membrane: For tile applications, use a waterproof membrane that covers the whole surface of the seat or better yet, covers the entire shower assembly.
- Finish: Select a solid-surface finish or at least a large-dimension tile or stone to limit grout joints.
- Caulking: Completely seal all joints---including the gap between the tile and the pan flange---with caulk specifically engineered for wet areas.
- Weep holes: Keep them clear of caulk and other blockages.