A Guide for Preventing Dryer Vent Fires
October 2019
Clogged dryer vents cause thousands of home fires each year. Make sure yours isn't one of them.
By Arlan Burdick
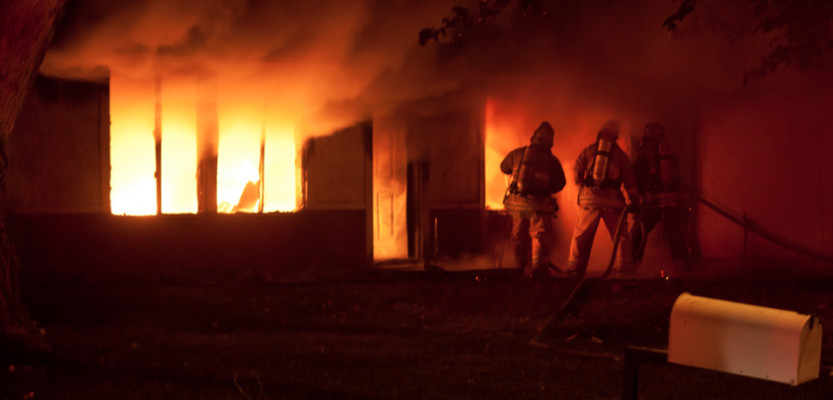
Most dryer vent fires start with ignition of built-up lint in the machine or the ductwork. (Photo: Flickr user Ada B / Creative Commons)
A useful way to think of dryer lint is as kindling. The National Fire Protection Association estimates there are nearly 15,000 dryer fires per year in the U.S., most of which started with the ignition of built-up lint in the machine or the ductwork.
As a builder, there's not much you can do about homeowners who never clean the lint from their machines, but you can
prevent lint buildup in ducts. It's a matter of choosing the right ductwork and installing it to ensure good airflow.
Sheet Metal Only
The only duct you should even consider for dryer venting is smooth sheet metal. The flex duct you see in some homes is a
lint clog waiting to happen, with internal ridges that seem almost designed as lint traps. Some builders have tried PVC, which
is also smooth, but it can create a type of static cling that invites lint to stick to the inside surface.
When installing the dryer, there is still the need for a short length of flexible transition duct to connect it to the end of the metal
duct. Rather than foil, use aluminum flex listed and labeled in accordance with UL 2158A, which has less-pronounced ridges.
If you don't install dryers in your homes (and many builders don't these days), recommend this to the homeowner.
Equivalent Lengths
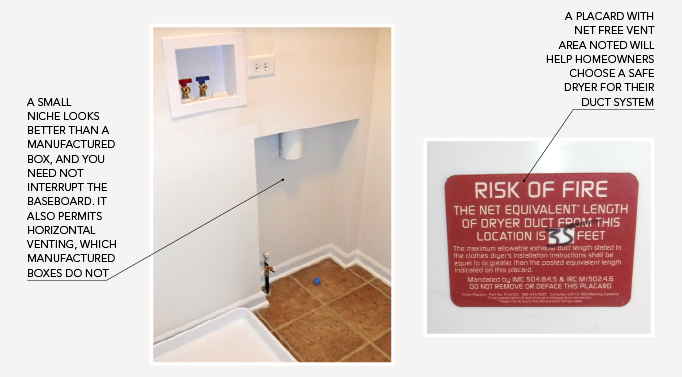
Of course, you also need to configure the duct in a way that ensures good airflow. The important number here is Net
Equivalent Length, which takes the reduced airflow from duct bends into account. A 45-degree elbow has about the same
resistance to airflow as 2.5 feet of straight duct, and a 90-degree elbow has the equivalent of about 5 feet of straight duct.
That means a 20-foot duct run with two 90-degree elbows will have a New Equivalent Length of 30 feet. It will pose the same
resistance to airflow as 30 feet of straight duct. Dryers are rated for different maximum duct lengths, so it's a good idea to
post this number near the duct termination to help homeowners choose a machine that will work with their ducting.
Minimizing Elbows
Obviously, you want to reduce elbows as much as possible, and an easy way to do this is with a dryer vent box. Although
most builders now install these in new homes, many do them wrong. A lot of dryer boxes are installed with their bottom edges
above floor level to avoid cutting into the baseboard. Unfortunately, this eliminates two important benefits of the dryer box.
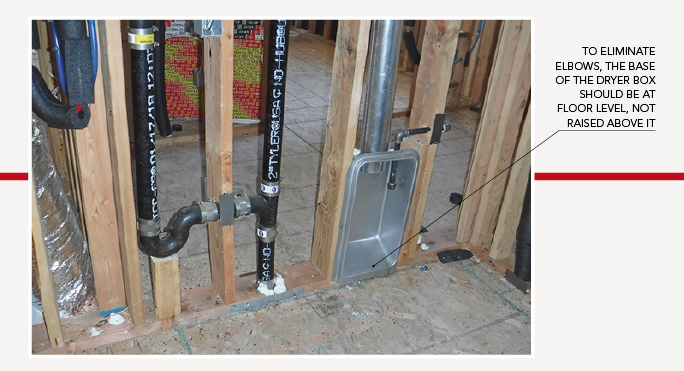
The dryer's exhaust port is usually at the base of the unit. Setting the dryer box at floor level—where it belongs—means you
can push the dryer right up against the wall and connect that piece of transition duct to the sheet metal duct with as few
bends as possible. But if you raise the box, you need three bends and won't be able to push the dryer up against the wall.
You've just reduced the room's usable floor space.
If you don't like the look of the dryer box, perhaps a more attractive alternative is to create a niche at the base of the wall,
then run the flooring and baseboard into it. This also gives you an added advantage that the dryer box doesn't: the ability to
vent the dryer sideways using one elbow. It's a great choice for a dryer placed next to an outside wall.
 Source: Professional Builder