Home Building Articles
How to Keep Stucco From Cracking
CONTROLLING CRACKS IN STUCCO LESSENS THE POTENTIAL FOR MORE SERIOUS PROBLEMS BELOW THE SURFACE, BUT IT REQUIRES A DEDICATED PROCESS AND ATTENTION TO DETAIL
Construction defect litigation is no joke, and cases citing poor stucco performance have been on court dockets since at least the 1990s. These days, it
seems, any fissure might be leveraged into a lawsuit.
But delivering a quality three-coat stucco job isn't a mystery. The science behind it is sound, and building codes and industry standards prescribe everything
from the right material ratios in the mix to the thickness of each coat, among other specs. But still the cracks keep on coming, causing unsightly surface
imperfections or worse, latent defects.
I get it: Labor is hard to come by lately, and your site supervision is spread pretty thin. Time is your enemy. But if you're going to make a porous material
the primary exterior finish of your homes, you have to watchdog it in your specs and in the field.
Most stucco problems occur when the cladding system is applied over a wood-framed wall assembly; in fact, stucco's use in the West, where wood is the predominant
framing material, is down from 72 percent to 55 percent in just over a decade—no doubt as a reflection of defect litigation.
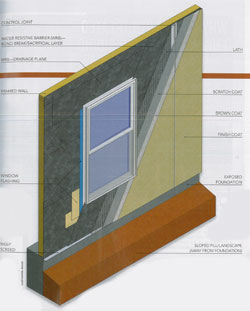
Use the illustration and follow this best-practices checklist to deliver a quality three-coat stucco job over a wood-framed wall so you can offer the popular
finish with confidence.
- Framing: Make sure the studs and plates are dry, tight, and plumb. Consider fully sheathing the exterior walls to provide a solid, flat
substrate.
- Weather resistive barrier (WRB): Apply two layers—the first as the drainage plane integrated with window, door, and penetration
flashings, the second as an independent bound break (or sacrificial layer). Avoid double-layer paper, which is sold as a time-saver but doesn't perform
properly.
- Accessories: Casing beads that isolate load-bearing from non-load-bearing members, openings, and intersections between dissimilar materials
provide a gap for sealants that manage movement; with corner bead and weep scfeeds, they help maintain the proper thickness of the stucco.
- Control joints: Follow ASTM C1063 guidelines for control joints not more than every 144 square feet along large stucco surfaces, with
no greater than 18 feet in an direction.
- Lath: Ensure that the proper weight and gauge is used, either self-furring or fastened and furred out with spacer nails. Fasten the lath
to framing members with attachments spaced at 7 inches on center along supports.
- Mix: Use clean materials—especially sand, the key ingredient to workability and overall mix performance. Mix with low-alkali cement; clean potable
water; and additives (such as lime) for workability. Follow code guidelines for your area or specify a pre-mix to ensure proper proportions.
- Scratch and brown: The cement-rich scratch coat, a first coat, adheres to and embeds into the lath to form a stable base; uniform prescribed
thickness is essential to allow small (1/16-inch or smaller) shrinkage cracks to form and enable consistent hydration and a strong cure. Fully hypdrate
the scratch coat daily from bottom to top so that it will bond with brown coat, a slightly thinner layer.
- Finish: The thinnest coat, applied and textured over a fully hypdrated brown coat, can have intefral color or be painted with high-quality
coatings.